
Making jam, jelly, or preserves hasn’t changed much through the centuries. Sure, there are a few things we do now that they didn’t do then, but the process remains the same since probably the Pilgrims landed at Plymouth Rock. And it’s not hard to reproduce. Here’s how they did it, and I’ll include the modern shortcuts as we go.
Definitions: after cooking, preserves still have bite-sized bits of fruit remaining; jam has mushed-up smaller bits; and jelly is smooth, pure jellied syrup. Jelly making is a different process, since you strain the fruit after cooking but before adding the sugar; if you're interested, the wonderful website PickYourOwn.org has directions and recipes.
1. Pick or buy the fruit. During the Regency, if your heroine lives or works in a manor or large farmhouse, the fruit would come from the gardens or orchard. If she’s in the village, she could find it in the nearby market town on market day, or perhaps she’s got a friend in the manor house’s kitchen. If she’s poor, she might steal blackberries from the manor’s woods.
These days, the grocery store or farmer’s market works just fine. You can use fresh or frozen, the latter with or without syrup, if you prefer low sugar jam. Fresh fruit needs to be washed, of course. Stone fruits, such as peaches or plums, need the pits removed, strawberries need to be hulled (removing the woody white or green stuff in the berry’s center and tip), and all of it needs to be chopped to bite-size bits and then crushed. Potato mashers work great. In a pinch, I’ve used a wooden spoon and smushed the fruit against the side of the pan.

Be careful not to prepare too much fruit. If you try to make the batch of jam or jelly too large, it won’t jell. For strawberry preserves, I use two pounds of fresh fruit per batch. That’s a conservative estimate, since it’s a bitch when the stuff refuses to cooperate. The instructions say you can use as much as six cups of prepared fruit; I say, why take a chance? It’s better to make two small batches and KNOW it’s going to jell, instead of trying to make one batch with all the fruit you bought and crossing your fingers.
(Remember reading and re-reading Little Women back in school? Remember the scene where Meg tried to make jelly in her new, married home, and had a fit because it wouldn’t jell? I’m pretty sure that’s what happened.)
For more exact measurements and canning recipes, PickYourOwn.org is a FABULOUS website.
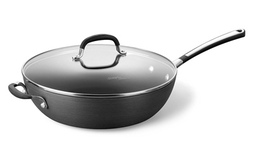
2. Dump the prepared fruit in a heavy pan, like this one.
Add a quarter cup of lemon juice. It won’t change the flavor and the acid will help the fruit to jell. During the Regency, lemons would be found in the orangery or greenhouse, and possibly imported from the Mediterranean, the Caribbean, and India. After about 1800, Royal Navy sailors drank grog (rum mixed with lemon juice and sugar) during their voyages around the world. If each sailor aboard each ship could have three to four ounces of lemon juice each day, then lemons came from somewhere and were fairly widely available.
Add a quarter cup of lemon juice. It won’t change the flavor and the acid will help the fruit to jell. During the Regency, lemons would be found in the orangery or greenhouse, and possibly imported from the Mediterranean, the Caribbean, and India. After about 1800, Royal Navy sailors drank grog (rum mixed with lemon juice and sugar) during their voyages around the world. If each sailor aboard each ship could have three to four ounces of lemon juice each day, then lemons came from somewhere and were fairly widely available.
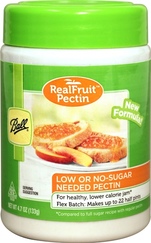
3. Meg didn’t have pectin back during the Civil War; nor did my mother have it during the Great Depression, so we know Regency heroines wouldn’t have had any. But we have it today and lemme tell you, it’s a life saver. Pectin is a natural product made from apples, and a few tablespoons added in at this step almost guarantees good results.
For the two pounds of fresh strawberries, I add three level tablespoons of pectin to a quarter cup of sugar. (I buy pectin in canisters, but it also comes in little boxes of individual servings.) Stir the sugar and pectin together, then stir the mixture into the fruit and lemon juice. Get the actual amount you need from the pectin container; it will vary according to the amount of fruit and sugar you’re using. It’s better to use too much pectin and be sure of good results than to use too little and hate yourself hours later.
If your Regency heroine is part of a manor house or good-sized village, it would be believable for an experienced cook or local wise woman to know about adding crushed apples or citrus fruit to the mixture as it cooks, to help it jell. All fruit contains some pectin, but apples don’t affect the flavor.
Without pectin, the alternative is to let the jam or jelly boil for a long time. A very long time. Say several hours. As long as it takes. On your feet, stirring it constantly.
I add pectin.

4. Turn on the heat and bring your concoction to a good, hard boil. Keep it stirred. The juice will separate from the fruit, forming a thin syrup with the fruit bits floating in it. It looks and smells yummy. When it reaches the point that you can’t stir the boiling away, then you’re ready to add the rest of the sugar.
You need a little bit of plain granulated table sugar to help the mixture jell. The minimum would be the quarter cup mixed into the pectin. During the Regency, the cook would add three or four more cups of table sugar at this point, or a very generous dollop of honey.
For modern cooking, you can choose your sweetener: more table sugar, honey, grape juice, or a sugar substitute such as the Truvia baking blend. The fabulous PickYourOwn.org website has information on the amounts of each needed for various types of fruit, or you can mix it to taste. And oh, the joy of tasting!
5. Stir the sweetener in well and bring the jam back to a hard boil. This time, let it cook for a few minutes. If you didn’t use pectin, let it cook until the jelling test in the next step works. The fruit juice syrup will thicken a bit, but not much. Remember to keep it stirred.
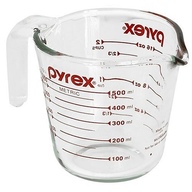
6. You can test the jelling with a small spoon and a cup of ice water. I use a measuring cup, filled to the top with ice, with enough water to let it float a bit.
Dip up a spoonful of the cooking jam, set the bowl of the spoon in the ice water without letting the water mix with the jam, and let it cool for at least a minute. With a measuring cup and lots of ice, I can set the spoon in that cradle and let it balance there, cooling while I keep stirring. After it cools, hold the spoon vertically. When the jam doesn’t budge, it’s cooked enough.
During the Regency, some of the richer houses might have ice remaining by summer and early autumn, when fruit would be harvested. Most wouldn’t. Regency cooks would have to remove the pot from the heat source, let it cool a while, and then try spooning it out and letting it cool to test the jelling. If it didn’t jell, the cook would have to boil it longer. Stirring it until it jelled or until, like Meg, she threw up her hands and screamed.
I use pectin.
7. This part is optional. You can let the jam sit and cool for about five to ten minutes, then stir it and ladle it into canning jars. If you don’t, the fruit will float to the top and after opening the jar, you’ll need to stir it before use. Because I’m lazy and mostly make jam for use here at home, I generally skip this step.
You can also skim off the foam that’s formed during the cooking. There’s nothing wrong with it; it’s just hardened syrup. But if you’re making presents, it does look better without the foam.
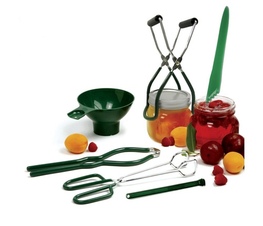
8. It’s a good idea to warm your glass canning jars before filling them with hot jam. When filling, you can use a canning funnel, and I imagine Regency cooks would have had something similar. Or you can use a ladle, as I do.
Then lay a clean canning lid on top of the filled jar’s mouth and screw a band on that to hold it down. No need to screw the band down tight; the lid has a ring of wax at the edges, which melts and forms a good seal.
During the Regency, the cook would soften the wax, apply it to the jar’s mouth, and seal it with either a stopper or a metal lid and more wax. I think stoppers were more common, but don’t quote me on that.
9. Final step, and while we have the option of skipping this one today, Regency cooks would not. This would be mandatory: it’s the preserving part of preserves, making them last longer without spoiling.
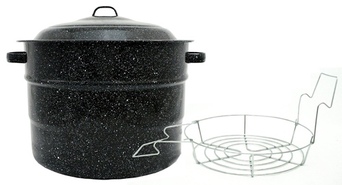
Get a big pot (or a real canning bath with wire rack), put your filled, sealed, and partially cooled jars of jam in it, and fill it with water to an inch over the lids. Put it on the stove and bring it to a boil. Let it boil for ten minutes (longer at higher altitudes); this will seal the jars (you’ll hear the sucking sound they make as the seal takes hold) and kill off any remaining bacteria.
Then you can turn off the burner and fish your jam jars out of the pot. I use metal tongs, but there’s also a jar grabber specially made for this task. And just like with the canning funnel, I imagine Regency cooks in estates or well-to-do farmhouses would have had a specially made set of tongs.
Process your jam this way if you intend to store it on the pantry shelf or give it as gifts. A tightly sealed jar will keep for up to a year.
If your preserves are for home use, you can skip this step and store the jars in the freezer. For that matter, you can also store the jam in those little plastic containers that lunch meat comes in; you just have to cool it some first and then freeze it. Remove it from the freezer to the fridge a day before use. Kept refrigerated, it should keep for a month to six weeks.
Thanks for stopping by. Cheers and happy reading,
Vivian


 RSS Feed